
With Christmas next week I thought I'd give an idea on a cute treat bag for your kids to take to their friends at school -- or a neighbor or two. I use "Publisher." The first photo is the front of the bag and the second photo is the back. The last photo shows the pieces in publisher that make the printed portion of the "label". Instructions begin at the 3rd photo.
 Step 1: Begin by opening up Publisher. Go to full page. Your margins for the label will be 4 1/2 x 6 1/2. Insert text box for back saying. I put a Bible verse there. You can put anything you want... maybe a family greeting. You will flip it vertically eventually.
 Step 2: Using side tool, add a rectangle. The size will be 2 1/4 x 6 1/2. Highlighting the rectangle, go up to "Line/Border style", pull box down and click on "More lines". Click on "Border Art" and find the checkered pattern. Click on the checkered pattern and also change the weight to be 13. Next find the color that you want. I chose a khaki green.
 Step 3: Make another two rectangle boxes. This time, both will have a fill color. I used the same khaki green. The first rectangle will be the same size as the checkerboard rectangle. Use your tool to remove the exterior line and add fill. In the fill section go to "fill effects", make it where it shades horizontally. I place the lighter color closest to the check. Do the same with the second box, however, this box's dimensions are 1 1/4 x 6 1/2. Using the same technique and color place this filled in box inside the checkerboard rectangle. Highlight the box and use your "free rotate" to angle it. Next use the "Arrange" tool bar and place the filled rectangles in the back.
 Step 4: Rotate your saying or flipping it vertically and place it at the very top of your box.
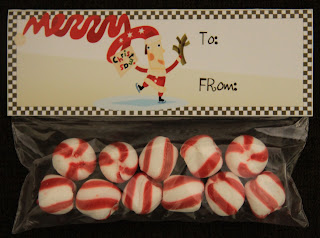
Step 5: Make another text box for your wording "To" and "From". Place those in the checkerboard box.
Step 6: Next, Using "Insert" tool box, click on "Picture" then "From Clip Art". In the Clip art section, plug in the wording "Merry Christmas" and scroll down to find the Santa. Double click on the Santa and it will automatically open up. Fit to scale with in your checkerboard. If it is not arranged properly, use the "Arrange" in the tool bar and click on "bring to front".
Step 7: I selected "all" and clicked on the "group objects" symbol to keep everything together. (Note: the angled filled box will hang off the sides, however these will be cropped off when you cut your labels out.) Then I copied and pasted one more set. Now you have two on a page. Print using satin finish photo paper and cut to size. Fold in half and staple or use double sided adhesive over your snack sized bags filled with candy.
Finished folded size of the label is 2 1/4 x 6 1/2.
Happy Printing!
No comments:
Post a Comment